Calling a PHP or Perl script from your GWT application can be a real challenge since the local webserver used by GWT (Jetty) is by default not able to execute scripts. Placing the script on a remote server where PHP can be executed is not an option, since that collides with your browser's Same Origin Policy. This security mechanism requires that your script is located at the same location where your GWT code resides.
So if you want to combine GWT with PHP or perl(python? ...) and still develop and test your GWT application locally, you have to be able to run scripts on your local machine.
The easiest way to do this, is to replace the GWT built-in jetty server with a pre-configured local webserver package. I am sure there is also a way to tell jetty how to read PHP, but if you don't need any server-side java, it's easier to use apache.
Step one: Install the local web server
First you have to download and install a local webserver. I recommend that you use the XAMPP-package which bundles a web server, MySQL, PHP and a lot more. The installation is quick and they have versions for Windows, OSX, Linux and Solaris. I chose the "light" version since it included all the tools I needed for the beginning.
Check if the local webserver is up and running by calling "http://localhost" from your browser. The XAMPP startpage should open up.
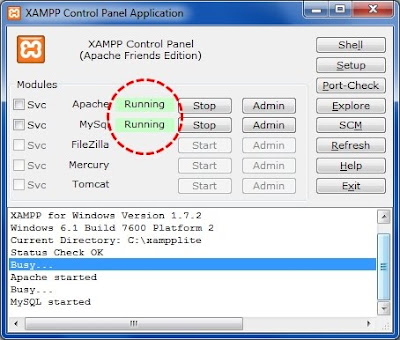
If you don't have a server-response on "http://localhost", make sure that the local webserver has actually been started. Start the XAMPP control panel application and check if apache is running.

Step two: Create the server directory structure
You need to copy a couple of files from your Eclipse workspace to the XAMPP server home-directory for hosted mode browsing to work.
My server-home directory looks like this:
HelloWorld.css
HelloWorld.html
helloworld\hosted.html
helloworld\helloworld.nocache.js
Check the script-tag in your HTML host page (HelloWorld.html) for the correct name and path of your *.nocache.js file.
<script type="text/javascript" language="javascript"

src="helloworld/helloworld.nocache.js"></script>
Step three: Tell GWT to use the local webserver
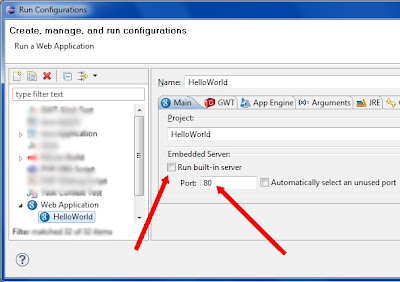
In order to have GWT actually use the local webserver you have to make some modifications in your Eclipse run-configuration. Right-click on your "HelloWorld" project in Eclipse and choose "Run As -> Run Configurations".

In the run configuration editor choose your "HelloWorld" application from the "Web Application" section on the left. Select the "Main" tab on the right side of the editor. Deselect the checkbox "Run built-in server" and change the port to 80.

That's it. If you start your GWT application, you can see in the hosted mode url-bar that it is served by apache (port 80 on localhost). Your GWT app now can use any script that is located on your local web server.
A note on security
A local webserver behaves like a "real" webserver. This means that your machine can be contacted on port 80 from the outside. Usually this port is blocked by your DSL or cable modem but in order to make sure, you might want to run a web-based portscan that checks for open ports on your computer. If in doubt: shut apache down!
Hey I need to know which to download ? and Do i need the addons ? please write me - curious_apprentice@rediff.com
AntwortenLöschenhttp://www.apachefriends.org/download.php?xampp-win32-1.7.7-VC9-installer.exe
http://www.apachefriends.org/download.php?xampp-win32-1.7.7-VC9.zip
http://www.apachefriends.org/download.php?xampp-win32-1.7.7-VC9.7z