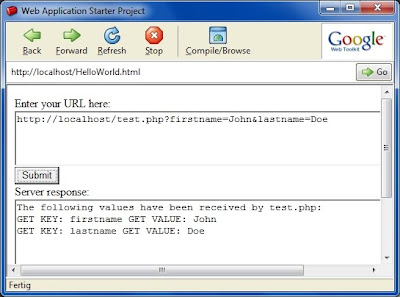
A quick look at the finished application
The finished "masterpiece" will look like this. You enter the URL + GET parameters of your PHP script in the inputField. Click "submit" and the application will display the server's response.

As described here the "Same Origin Policy" requires the PHP script to reside on the same server where your GWT code is. To develop your application on your local computer you probably have to start with the installation of a local webserver.
Step one: Install a local Apache web server
In order to run PHP code on your local machine it makes sense to install a local development server as described in this tutorial. This is just a matter of minutes if you use the pre-configured XAMPP package as suggested in the tutorial.
Step two: write a PHP script that processes your request on the server side
For testing purposes I use this small PHP script that will simply echo out the input it receives to the sender.
<?php
echo "The following values have been received by test.php:\n";
foreach ($_GET as $key=>$value) {
        echo "GET KEY: $key GET VALUE: $value\n";
}

foreach ($_POST as $key=> $value) {
        echo "POST KEY: $key POST VALUE: $value\n";
}
?>
Save this script under the name "test.php" in your XAMPP htdocs-directory. As described in the previous tutorial, you need also to copy some GWT-files to the htdocs-directory to be able to run your application in hosted mode. Your htdocs-directory should contain the following files:
HelloWorld.css
HelloWorld.html
test.php
helloworld\hosted.html
helloworld\helloworld.nocache.js
Step three: Tell GWT to use HTTP
In order to be able to use the HTTP-methods in GWT you have to include the following line of code to your module-xml file (HelloWorld.gwt.xml). See this tutorial for details.
<inherits name="com.google.gwt.http.HTTP"/>
Step four: Create your entry point method "onModuleLoad" and some global widgets
public TextArea inputField = new TextArea();
public TextArea outputField = new TextArea();
public VerticalPanel vPanel = new VerticalPanel();


/**
 * This is the entry point method.
 */
public void onModuleLoad() {

        Button submitButton = new Button("Submit");

        inputField.setText("http://localhost/test.php?");
        inputField.setSize("600px", "75px");
        outputField.setSize("600px", "200px");

        // Button click handler. Calls the server query
        submitButton.addClickHandler(new ClickHandler() {
                public void onClick(ClickEvent event) {
                        doGet(inputField.getText());
                }
        }); // submitButton clickHandler

        // add some widgets to the user interface.
        vPanel.add(new Label("Enter your URL here:"));
        vPanel.add(inputField);
        vPanel.add(submitButton);
        vPanel.add(new Label("Server response:"));
        vPanel.add(outputField);
        RootPanel.get().add(vPanel);
}
Step five: Create the method that processes the server response
When firing a server query you need to process the server's response asynchronously since it would be a bad idea to freeze the application until the response has arrived. This is done in "doGet" with a RequestCallback object whose "onResponseReceived" method is executed by the time the response arrives. "onResponseReceived" then calls my own method (processResponse) to which it passes the response-string it received (the output of the PHP script). "processResponse" is very simple: It just displays the server's response in the "outputField".
public void processResponse(String responseString) {
        outputField.setText(responseString);
} // processResponse
Step six: Create the method that fires the GET-request
This method does the actual work. It calls the url you have enterd in the inputField and creates a callback object whose "onResponseReceived" method is executed by the time the response arrives. This method calls "processResponse" shown above and passes on the returned string.
public void doGet(String myurl) {
        // make sure spaces and special characters have the correct encoding
        myurl = URL.encode(myurl);

        RequestBuilder builder = new RequestBuilder(RequestBuilder.GET, myurl );

        try {
          Request request = builder.sendRequest(null, new RequestCallback() {
            public void onError(Request request, Throwable exception) {
                processResponse("ERROR. Could not connect to server.");
            }

            public void onResponseReceived(Request request, Response response) {
              if (200 == response.getStatusCode()) {
                  // call the method in main class to process the response
                  processResponse(response.getText());
              } else {
                  processResponse("ERROR. Errorcode: " + response.getStatusCode());
              }
            }
          });

        } catch (RequestException e) {
                processResponse("ERROR. No connection to server");
        }
}
Using the application
To use the application simply add your GET-values to the URL that calls your PHP script. The format of the call must be: key=value&key2=value2
http://localhost/test.php?myname=John&mylastname=Smith
Keine Kommentare:
Kommentar veröffentlichen