- Clientside GChart seems to have stopped development for more than a year.
- gflot is - well - too much "plot"-like for what I need.
- GWT Highcharts is probably ok for my purpose and looks as if it was relatively easy to use. Good, since I don't want to spent three days digging into a charts api. http://www.moxiegroup.com/moxieapps/gwt-highcharts/
- ExtGWT is based on flash
- Arcadiacharts seems to be ok for my purpose too. The charts look good and it also seems to be relatively easy to use. http://www.arcadiacharts.com/demos
Montag, 16. April 2012
Library for making charts
For a new project I need a library for making charts. Boss says: "no flash", so products like Open Flash Chart can not be used. Google Visualization API is also not possible. So my choices seem to be the following:
Montag, 27. Februar 2012
Great new features since GWT 2.2
It has been a while since I wrote my last post here and GWT has come a long since then. GWT 2.4 has been released a little while ago. A lot of really cool new features have been added to GWT in the last months including:
- Support for html5-canvas. The gwtcanvas-project has been in the incubator for almost three years but now it is finally an official part of GWT. Really cool is the fact that even outdated Internet-Explorer versions are supported through VML.
- Finally a GUI-designer has made its way into GWT. It may be not as advanced as other UI-builders but it is already a great help for internface creation.
- Support for touchscreens as found in smartphones with gwt-touch.
- In the early days people used "applications" that could be bought at many different places online or in a store. Nowadays they use "apps" that are sold through closed channels controlled by the big hardware manufacturers. So its not to my surprise that google added support for the "android apps marketplace" to GWT.
Montag, 1. März 2010
EventBus and MVP
At last years Google IO Ray Ryan presented a collection of architecture recommendations for GWT applications based on what the team found best practices when developing the new AdWords application at Google. This guy took the effort to transcribe the complete presentation and even included all the slides.
The presented technologies were: MVP, Display Interface and EventBus.
Now Google has published a new introductory article covering everything mentioned in Ray's presentation and a lot more.
This is a must-read for every developer who wants to seriously proceed with GWT application development :Large scale application development and MVP
Montag, 1. Februar 2010
Dependency Injection - What ist that good for and how do I use it?
Dependency injection has become quite popular in recent years. The basic principle behind it is useful, simple and straightforward. Here we go:
The problem: tightly coupled objects
Let's suppose we want to create a simple calendar application. You want the flexibility of the calendar events either to be stored in a database on a remote server or locally in a text file. The simplified class-structure could look like this:
Now we can implement our Calendar-Class like this:
or, following the paradigm of "program to an interface, not an implementation" we could use this code:
Both solutions have the calendar-class tightly coupled to the entries-class. This resulting in the issue that if you want to use entries from another source, you have to change the code of the calendar class!
Why is tight coupling a problem?
Tight coupling is not a problem in general as long as you work on a small project in an environment completely controlled by one developer. As soon as a team is involved or unit testing is necessary, the tight coupling could become a huge issue soon.
Solution 1: constructor based injection
This is so simple that I can hear your "thats all?" moaning already: we just let the constructing object decide, which CalendarEntries implementation to use. The Calendar-class will use whatever it gets at construction time:
To use the calendar-class we call it like this:
Solution 2: setter based injection
Instead of directly in the constructor the data source could also be set in a setter-method. The underlying principle is basically the same:
And it would be used like this:
The problem: tightly coupled objects
Let's suppose we want to create a simple calendar application. You want the flexibility of the calendar events either to be stored in a database on a remote server or locally in a text file. The simplified class-structure could look like this:
public interface CalendarEntries {
   ...
}

public class EntriesInDatabase implements CalendarEntries {
   ...
}

public class EntriesInLocalFile implements CalendarEntries {
   ...
}
Now we can implement our Calendar-Class like this:
public class Calendar {
   private EntriesInDatabase calendarEntries;
}
or, following the paradigm of "program to an interface, not an implementation" we could use this code:
public class Calendar {
   private CalendarEntries calendarEntries = new EntriesInDatabase();
}
Both solutions have the calendar-class tightly coupled to the entries-class. This resulting in the issue that if you want to use entries from another source, you have to change the code of the calendar class!
Why is tight coupling a problem?
Tight coupling is not a problem in general as long as you work on a small project in an environment completely controlled by one developer. As soon as a team is involved or unit testing is necessary, the tight coupling could become a huge issue soon.
Solution 1: constructor based injection
This is so simple that I can hear your "thats all?" moaning already: we just let the constructing object decide, which CalendarEntries implementation to use. The Calendar-class will use whatever it gets at construction time:
public class Calendar {
        private CalendarEntries calendarEntries;

        public Calendar(CalendarEntries entries) {
                this.calendarEntries = entries;
        }

        ....
}
To use the calendar-class we call it like this:
public class TestCalendar {
        public static void main(String[] args) {
                Calendar myServerCalendar = new Calendar(new EntriesInDatabase());
                Calendar myLocalCalendar = new Calendar(new EntriesInLocalFile());
        }
}
Solution 2: setter based injection
Instead of directly in the constructor the data source could also be set in a setter-method. The underlying principle is basically the same:
public class Calendar {
        private CalendarEntries calendarEntries;

        public void setCalendarEntries(CalendarEntries entries) {
                this.calendarEntries = entries;
        }

        ....
}
And it would be used like this:
public class TestCalendar {
        public static void main(String[] args) {
                Calendar myServerCalendar = new Calendar();
                myServerCalendar.setCalendarEntries(new EntriesInDatabase());

                Calendar myLocalCalendar = new Calendar();
                myLocalCalendar.setCalendarEntries(new EntriesInLocalFile());
        }
}
Montag, 30. November 2009
How to use GWT with PHP
To use PHP on the server side in combination with a GWT client-application makes a lot of sense, since most inexpensive webhosting solutions permit you at least to run PHP on their machines. In this tutorial I demonstrate the basic steps for calling a PHP script from a GWT application using HTTP GET.
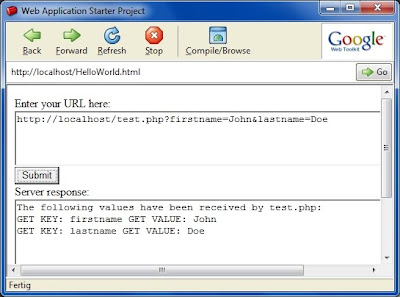
A quick look at the finished application
The finished "masterpiece" will look like this. You enter the URL + GET parameters of your PHP script in the inputField. Click "submit" and the application will display the server's response.
As described here the "Same Origin Policy" requires the PHP script to reside on the same server where your GWT code is. To develop your application on your local computer you probably have to start with the installation of a local webserver.
Step one: Install a local Apache web server
In order to run PHP code on your local machine it makes sense to install a local development server as described in this tutorial. This is just a matter of minutes if you use the pre-configured XAMPP package as suggested in the tutorial.
Step two: write a PHP script that processes your request on the server side
For testing purposes I use this small PHP script that will simply echo out the input it receives to the sender.
Save this script under the name "test.php" in your XAMPP htdocs-directory. As described in the previous tutorial, you need also to copy some GWT-files to the htdocs-directory to be able to run your application in hosted mode. Your htdocs-directory should contain the following files:
Step three: Tell GWT to use HTTP
In order to be able to use the HTTP-methods in GWT you have to include the following line of code to your module-xml file (HelloWorld.gwt.xml). See this tutorial for details.
Step four: Create your entry point method "onModuleLoad" and some global widgets
Step five: Create the method that processes the server response
When firing a server query you need to process the server's response asynchronously since it would be a bad idea to freeze the application until the response has arrived. This is done in "doGet" with a RequestCallback object whose "onResponseReceived" method is executed by the time the response arrives. "onResponseReceived" then calls my own method (processResponse) to which it passes the response-string it received (the output of the PHP script). "processResponse" is very simple: It just displays the server's response in the "outputField".
Step six: Create the method that fires the GET-request
This method does the actual work. It calls the url you have enterd in the inputField and creates a callback object whose "onResponseReceived" method is executed by the time the response arrives. This method calls "processResponse" shown above and passes on the returned string.
Using the application
To use the application simply add your GET-values to the URL that calls your PHP script. The format of the call must be: key=value&key2=value2
A quick look at the finished application
The finished "masterpiece" will look like this. You enter the URL + GET parameters of your PHP script in the inputField. Click "submit" and the application will display the server's response.

As described here the "Same Origin Policy" requires the PHP script to reside on the same server where your GWT code is. To develop your application on your local computer you probably have to start with the installation of a local webserver.
Step one: Install a local Apache web server
In order to run PHP code on your local machine it makes sense to install a local development server as described in this tutorial. This is just a matter of minutes if you use the pre-configured XAMPP package as suggested in the tutorial.
Step two: write a PHP script that processes your request on the server side
For testing purposes I use this small PHP script that will simply echo out the input it receives to the sender.
<?php
echo "The following values have been received by test.php:\n";
foreach ($_GET as $key=>$value) {
        echo "GET KEY: $key GET VALUE: $value\n";
}

foreach ($_POST as $key=> $value) {
        echo "POST KEY: $key POST VALUE: $value\n";
}
?>
Save this script under the name "test.php" in your XAMPP htdocs-directory. As described in the previous tutorial, you need also to copy some GWT-files to the htdocs-directory to be able to run your application in hosted mode. Your htdocs-directory should contain the following files:
HelloWorld.css
HelloWorld.html
test.php
helloworld\hosted.html
helloworld\helloworld.nocache.js
Step three: Tell GWT to use HTTP
In order to be able to use the HTTP-methods in GWT you have to include the following line of code to your module-xml file (HelloWorld.gwt.xml). See this tutorial for details.
<inherits name="com.google.gwt.http.HTTP"/>
Step four: Create your entry point method "onModuleLoad" and some global widgets
public TextArea inputField = new TextArea();
public TextArea outputField = new TextArea();
public VerticalPanel vPanel = new VerticalPanel();


/**
 * This is the entry point method.
 */
public void onModuleLoad() {

        Button submitButton = new Button("Submit");

        inputField.setText("http://localhost/test.php?");
        inputField.setSize("600px", "75px");
        outputField.setSize("600px", "200px");

        // Button click handler. Calls the server query
        submitButton.addClickHandler(new ClickHandler() {
                public void onClick(ClickEvent event) {
                        doGet(inputField.getText());
                }
        }); // submitButton clickHandler

        // add some widgets to the user interface.
        vPanel.add(new Label("Enter your URL here:"));
        vPanel.add(inputField);
        vPanel.add(submitButton);
        vPanel.add(new Label("Server response:"));
        vPanel.add(outputField);
        RootPanel.get().add(vPanel);
}
Step five: Create the method that processes the server response
When firing a server query you need to process the server's response asynchronously since it would be a bad idea to freeze the application until the response has arrived. This is done in "doGet" with a RequestCallback object whose "onResponseReceived" method is executed by the time the response arrives. "onResponseReceived" then calls my own method (processResponse) to which it passes the response-string it received (the output of the PHP script). "processResponse" is very simple: It just displays the server's response in the "outputField".
public void processResponse(String responseString) {
        outputField.setText(responseString);
} // processResponse
Step six: Create the method that fires the GET-request
This method does the actual work. It calls the url you have enterd in the inputField and creates a callback object whose "onResponseReceived" method is executed by the time the response arrives. This method calls "processResponse" shown above and passes on the returned string.
public void doGet(String myurl) {
        // make sure spaces and special characters have the correct encoding
        myurl = URL.encode(myurl);

        RequestBuilder builder = new RequestBuilder(RequestBuilder.GET, myurl );

        try {
          Request request = builder.sendRequest(null, new RequestCallback() {
            public void onError(Request request, Throwable exception) {
                processResponse("ERROR. Could not connect to server.");
            }

            public void onResponseReceived(Request request, Response response) {
              if (200 == response.getStatusCode()) {
                  // call the method in main class to process the response
                  processResponse(response.getText());
              } else {
                  processResponse("ERROR. Errorcode: " + response.getStatusCode());
              }
            }
          });

        } catch (RequestException e) {
                processResponse("ERROR. No connection to server");
        }
}
Using the application
To use the application simply add your GET-values to the URL that calls your PHP script. The format of the call must be: key=value&key2=value2
http://localhost/test.php?myname=John&mylastname=Smith
Sonntag, 29. November 2009
How to use a local apache webserver with GWT
OK, why would you want to do this?
Calling a PHP or Perl script from your GWT application can be a real challenge since the local webserver used by GWT (Jetty) is by default not able to execute scripts. Placing the script on a remote server where PHP can be executed is not an option, since that collides with your browser's Same Origin Policy. This security mechanism requires that your script is located at the same location where your GWT code resides.
So if you want to combine GWT with PHP or perl(python? ...) and still develop and test your GWT application locally, you have to be able to run scripts on your local machine.
The easiest way to do this, is to replace the GWT built-in jetty server with a pre-configured local webserver package. I am sure there is also a way to tell jetty how to read PHP, but if you don't need any server-side java, it's easier to use apache.
Step one: Install the local web server
First you have to download and install a local webserver. I recommend that you use the XAMPP-package which bundles a web server, MySQL, PHP and a lot more. The installation is quick and they have versions for Windows, OSX, Linux and Solaris. I chose the "light" version since it included all the tools I needed for the beginning.
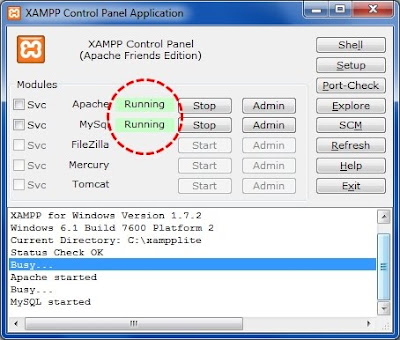
Check if the local webserver is up and running by calling "http://localhost" from your browser. The XAMPP startpage should open up.
If you don't have a server-response on "http://localhost", make sure that the local webserver has actually been started. Start the XAMPP control panel application and check if apache is running.
Step two: Create the server directory structure
You need to copy a couple of files from your Eclipse workspace to the XAMPP server home-directory for hosted mode browsing to work.
My server-home directory looks like this:
Check the script-tag in your HTML host page (HelloWorld.html) for the correct name and path of your *.nocache.js file.
Step three: Tell GWT to use the local webserver
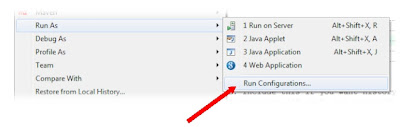
In order to have GWT actually use the local webserver you have to make some modifications in your Eclipse run-configuration. Right-click on your "HelloWorld" project in Eclipse and choose "Run As -> Run Configurations".
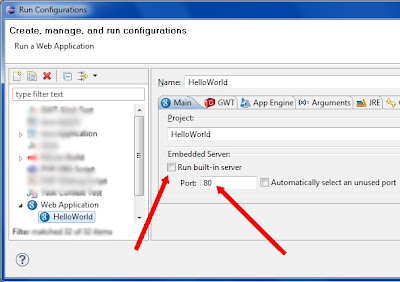
In the run configuration editor choose your "HelloWorld" application from the "Web Application" section on the left. Select the "Main" tab on the right side of the editor. Deselect the checkbox "Run built-in server" and change the port to 80.
That's it. If you start your GWT application, you can see in the hosted mode url-bar that it is served by apache (port 80 on localhost). Your GWT app now can use any script that is located on your local web server.
A note on security
A local webserver behaves like a "real" webserver. This means that your machine can be contacted on port 80 from the outside. Usually this port is blocked by your DSL or cable modem but in order to make sure, you might want to run a web-based portscan that checks for open ports on your computer. If in doubt: shut apache down!
Calling a PHP or Perl script from your GWT application can be a real challenge since the local webserver used by GWT (Jetty) is by default not able to execute scripts. Placing the script on a remote server where PHP can be executed is not an option, since that collides with your browser's Same Origin Policy. This security mechanism requires that your script is located at the same location where your GWT code resides.
So if you want to combine GWT with PHP or perl(python? ...) and still develop and test your GWT application locally, you have to be able to run scripts on your local machine.
The easiest way to do this, is to replace the GWT built-in jetty server with a pre-configured local webserver package. I am sure there is also a way to tell jetty how to read PHP, but if you don't need any server-side java, it's easier to use apache.
Step one: Install the local web server
First you have to download and install a local webserver. I recommend that you use the XAMPP-package which bundles a web server, MySQL, PHP and a lot more. The installation is quick and they have versions for Windows, OSX, Linux and Solaris. I chose the "light" version since it included all the tools I needed for the beginning.
Check if the local webserver is up and running by calling "http://localhost" from your browser. The XAMPP startpage should open up.
If you don't have a server-response on "http://localhost", make sure that the local webserver has actually been started. Start the XAMPP control panel application and check if apache is running.

Step two: Create the server directory structure
You need to copy a couple of files from your Eclipse workspace to the XAMPP server home-directory for hosted mode browsing to work.
My server-home directory looks like this:
HelloWorld.css
HelloWorld.html
helloworld\hosted.html
helloworld\helloworld.nocache.js
Check the script-tag in your HTML host page (HelloWorld.html) for the correct name and path of your *.nocache.js file.
<script type="text/javascript" language="javascript"

src="helloworld/helloworld.nocache.js"></script>
Step three: Tell GWT to use the local webserver
In order to have GWT actually use the local webserver you have to make some modifications in your Eclipse run-configuration. Right-click on your "HelloWorld" project in Eclipse and choose "Run As -> Run Configurations".

In the run configuration editor choose your "HelloWorld" application from the "Web Application" section on the left. Select the "Main" tab on the right side of the editor. Deselect the checkbox "Run built-in server" and change the port to 80.

That's it. If you start your GWT application, you can see in the hosted mode url-bar that it is served by apache (port 80 on localhost). Your GWT app now can use any script that is located on your local web server.
A note on security
A local webserver behaves like a "real" webserver. This means that your machine can be contacted on port 80 from the outside. Usually this port is blocked by your DSL or cable modem but in order to make sure, you might want to run a web-based portscan that checks for open ports on your computer. If in doubt: shut apache down!
Samstag, 28. November 2009
GWT configuration files and project organization
In this post I show you the very basics of file organization in a GWT project. A comprehensive overview covering all aspects of project organization can be found on the main GWT page.
A GWT project consists of at least three files (you usually have a lot more but these are essential):
If you generated the "HelloWorld" example as described in the previous post, your project is organized as shown below:

The module XML file
This is the main configuration file for GWT. Here you tell GWT where to find your entry point class. You define a CSS stylesheet and inherit external modules. Don't worry about the content of the file at this point.
If you double-click on the module XML file, the XML-Editor opens up by default. I use the text-editor instead. To open the XML-file with the text editor right-click on the filename in the Eclipse Project-Explorer and select "Open With -> Text Editor".

The entry point class
All of your coding starts here. This class is the main entry point of your application. It must implement the interface "EntryPoint" and has to contain the public void method "onModuleLoad()".
The HTML host page
The HTML host page is the starting point of your application. You already know that GWT compiles your java-code into JavaScript so that it can be executed by your browser. But you cannot load a JavaScript file directly into the browser. It has to be called from within an HTML file. This is exactly what the HTML host page does: bootstrapping your application.
Your GWT application is started by opening the HTML hostpage in the browser. The hostpage defines the CSS stylesheet, prints a couple of HTML elements (the headline "Web Application Starter Project") and then executes helloworld.nocache.js. This script just identifies your browser and then loads a browser specific JavaScript file with your application.
A GWT project consists of at least three files (you usually have a lot more but these are essential):
- a module XML file telling GWT where to find its properties.
- an entry point class (this is the .java class with the "onModuleLoad" method).
- a HTML host page that is called from the browser to start your application.
If you generated the "HelloWorld" example as described in the previous post, your project is organized as shown below:

The module XML file
This is the main configuration file for GWT. Here you tell GWT where to find your entry point class. You define a CSS stylesheet and inherit external modules. Don't worry about the content of the file at this point.
If you double-click on the module XML file, the XML-Editor opens up by default. I use the text-editor instead. To open the XML-file with the text editor right-click on the filename in the Eclipse Project-Explorer and select "Open With -> Text Editor".

The entry point class
All of your coding starts here. This class is the main entry point of your application. It must implement the interface "EntryPoint" and has to contain the public void method "onModuleLoad()".
The HTML host page
The HTML host page is the starting point of your application. You already know that GWT compiles your java-code into JavaScript so that it can be executed by your browser. But you cannot load a JavaScript file directly into the browser. It has to be called from within an HTML file. This is exactly what the HTML host page does: bootstrapping your application.
Your GWT application is started by opening the HTML hostpage in the browser. The hostpage defines the CSS stylesheet, prints a couple of HTML elements (the headline "Web Application Starter Project") and then executes helloworld.nocache.js. This script just identifies your browser and then loads a browser specific JavaScript file with your application.
Abonnieren
Kommentare (Atom)